ROPE WORK
KNOTS. WHIPPINGS AND SEIZINGS
A number of commonly used knots must be learnt by every seaman. You will have to be able to tie the knots described here to pass your Efficient Deck Hand (EDH) examination.
Strength of Knotted Ropes
A knot will reduce the strength of a fibre rope by between 40 and 60 per cent. If there is more than one knot in a rope its strength will not be progressively reduced, the allowance for one knot is sufficient.
Terms Used
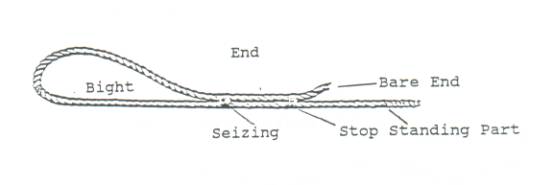
- Bight is the middle part of a length of rope and also refers to a loop of rope. To "make a bight" means to form a loop.
- End. This is the short length at the end of a bight or knot. The "bare end" is the extreme end of the length of rope.
- Standing part is the length of rope nearest the bight or knot.
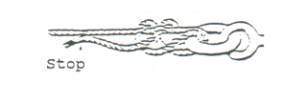
- A Stop is a temporary fastening to hold a rope in place. It is not meant to bear any strain other than that required to keep the rope in place.
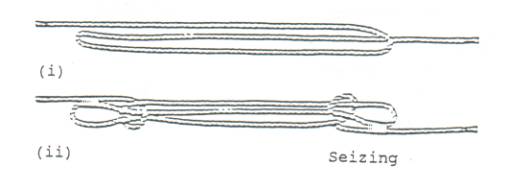
A Seizing is used to fasten two ropes or two parts of a rope securely together.
A Whipping is used to bind the bare end of a rope to prevent the strands from unlaying.
Reef Knot
A reef knot consists of two overhand knots and is used to join two ropes of approximately equal size.
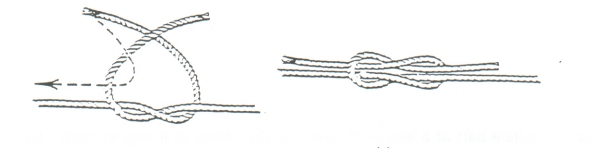
To form a reef knot the ends must be crossed in opposite
ways for each overhand knot i.e. right over left then
left over right, or vice versa. Otherwise the result will
be a granny knot which will either slip or jam depending
on whether it is made with or against the lay of the
rope.
Figure of Eight Knots
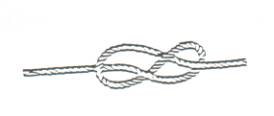
This knot is used on the lifelines of the Lifeboat davit span wire to form hand grips. It is also used to prevent a rope from unreeving through an eye.
Timber Hitch

Used to secure a rope to a piece of wood. If the wood is
to be hoisted or lowered a half hitch is also made.
Round turn and two half hitches
Used to secure a heavy load to a ring or shackle. It will not jam. The end should always be stopped to the standing port.
Bowline
This is the most useful knot for making temporary eyes in all sizes of rope. It is used to join a heaving line to the eye of a mooring rope.
Take the end in the right hand and the standing part in the left. Place the end over the standing part and hold the cross thus formed between the index finger and thumb of the right hand, with the thumb underneath. The loop so formed becomes the bight of the bowline, then turn the wrist to the right away from the body, and bring the end up through the loop so formed. Hold the cross of the loop in the left hand leaving the right hand free to manipulate the end as shown in the figure to compete the bowline.

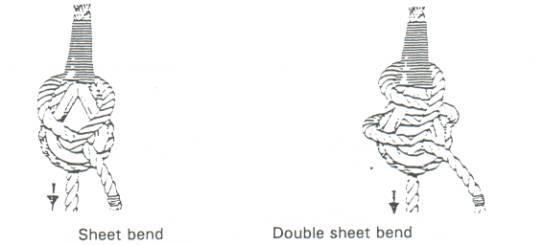
Sheet Bend
Used to join a small diameter rope to a larger one. It will not easily slip and is easily let go.
Double Sheet Bend
An even more secure method of accomplishing the same purposes as a sheet bend.
Monkey's Fist
Used to weight the end of a heaving line so that it will carry when thrown against the wind. It takes from 2 to 3 metres of line.
1.
Wind three turns round the hand.
2. Pass a second set of three turns
around the first three.
3. Pass a third set of turns round the
second set but inside the first set.
The end will come out alongside the standing part.
4. To finish the knot work all parts
taut and splice the end into the standing part.
Sheep Shank
Used to shorted the bight of a rope without cutting it. Used on the grab lines around lifeboats.
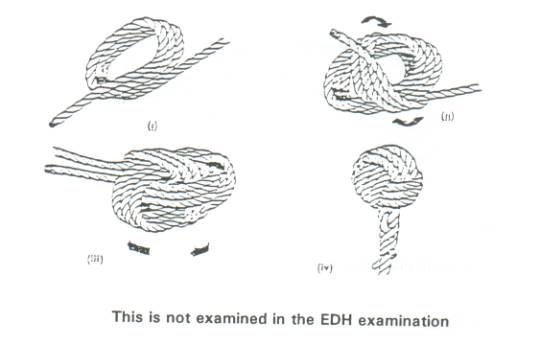
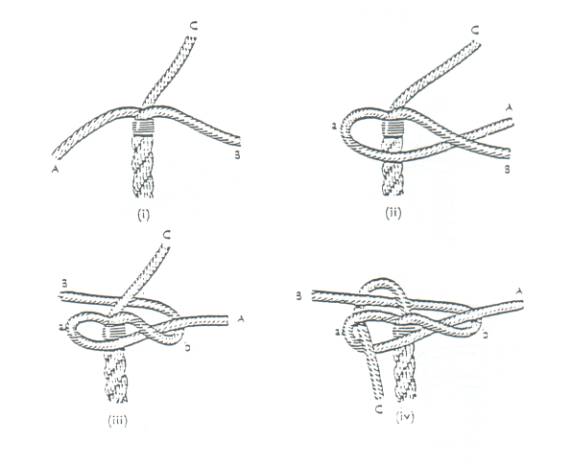
Crown Knot
When finished, the crown knot leaves the three strands pointing back along the rope. It is used to begin a back splice and as a basis for more complicated knots.
To form a crown, whip the rope at a distance from its end equal to 12 times its diameter. Then unlay the strands to the shipping, whip their ends and spread them out. The bring strand C to the front to form a loop (i); place strand A over C and behind B (ii). Thread strand B through the loop of C (iii); pull all strands until the knot is uniform (iv).

Wall Knot
When finished the wall knot leaves all three strands pointing in their original directions. It is never used by itself.
Prepare the rope as for a crown; then take strand A and pass it under strand B; take B round A and under C; take C round b and bring it up through the bight a.
Wall and Crown Knot
As the name states a wall knot is formed first and a crown is formed on top. This can be used to finish off a rope's end so as to prevent it from unreeving, e.g. the safety lines on a wooden rudder for a boat.
WHIPPINGS
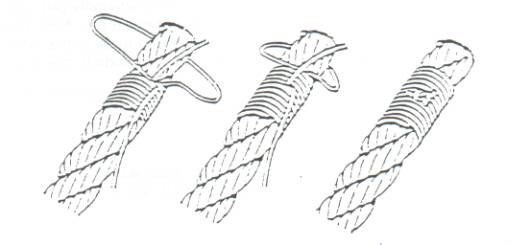
Common Whipping
Seaming or roping twine is used when
the rope is not large, and small stuff is used when the
rope is cumbersome and large. Place the end of the twine
along the rope; pass turns of the twine over the rope
against its lay, working towards the end of the rope, and
haul each turn taut. Then lay the other end of the twine
along the rope, and pass the remaining turns over it,
taking the bight of twine over the end of the rope with
each turn. When the bight becomes too small to pass over
the end of the rope, haul this second end of the twine
through the turns which you have passed over it until
taut, thus completing the last turn round the rope, and
cut off the end.

An alternative finish, which can be used when the whipping is on the bight of the rope, is to take the last three or four turns loosely over one finger and pass the end back through them. The turns are worked taut, and the end hauled taut as above.
American Whipping
This is similar to the common whipping except that the first end of twine is left out clear between the first and second half of the turns, the two ends are secured together with a reef knot and cut off.
West Country Whipping
This is very useful when it is required to whip the bight of a rope. Middle the twine on the rope in the position required, pass the two ends round the rope in opposite directions and half-knot them on the other side; now bring the ends up and half-knot them again, and continue in this manner, making a half-knot every half-turn so that the half-knots lie alternately on opposite sides of the rope. then finish off with a reef knot.

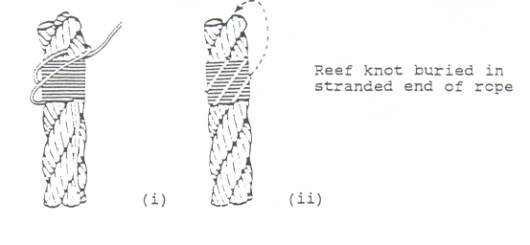
Sailmaker's Whipping
This whipping is the most secure; it will not work adrift under any circumstances and should always be used for man-made fibre ropes. (The end of the man-made fibre rope should also be sealed over a match flame). Unlay the end of the rope for about 5 centimetres and hold it in the left hand pointing upwards, with the middle strand farthest away. Now make a bight in the twine about 20 centimetres long and pass this bight over the middle strand only, with the two ends towards you. Then, with the bight of twine hanging down the back of the rope and the ends pointing down in front, lay up the rope with the right hand. Leave the short end of twine where it is and, with the long end, pass the turns of the whipping, working towards the end of the rope against the lay.
When sufficient turns are on, take the bight of twine, pass it up the outside of the whipping, following the lay of the strand around which it was originally put, and pass it over that strand, where the latter comes out at the end of the rope. Now haul on the short end so as to tighten the bight, then bring this end up outside the whipping, again following the lay of the rope, and then reef knot the two ends in the middle of the rope and out of sight.