Every seaman worth his salt must be able to splice hawser-laid and plaited cordage. There is nothing difficult about it, and with practice splicing becomes a simple operation. It is a method of joining the ends of two ropes together, or of making an eye in the end of a rope, by interlocking the strands. Unless otherwise stated it should be accepted that all splices reduce the strength of the rope by 10 per cent. The only tools needed are a fid, which is a pointed wooden spike made of lignum vitae or other hardwood, a sharp knife and seaming or sailmaker's twine for whipping where necessary.
When reference is made in the text of this section to the left or the right of a rope imagine yourself to be looking along the rope towards the end which you are handling.
Back Splice - For finishing the end of a rope which is not required to be rove through a block; it prevents it from unlaying.
Eye Splice - For making a permanent eye in the end of a rope. Short Splice For joining two ropes not required to pass through a block.
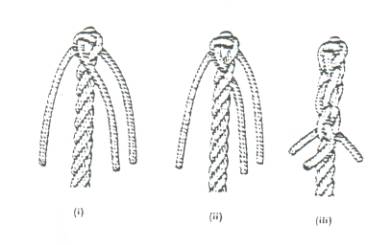
Back Splice
Whip the rope at a distance from its end equal to 20 times the diameter of the rope, then unlay the strands to the whipping and whip the end of each strand. Make a crown knot (i), cut the whipping and then tuck each strand over one strand and under the next, to the left and against the lay of the rope, as shown in (ii). After each strand is tucked, pull the strands taut and tidy up this first tuck until each strand is uniform. Repeat this tucking twice more (iii). Always tuck to the left, using the next strand to the left.
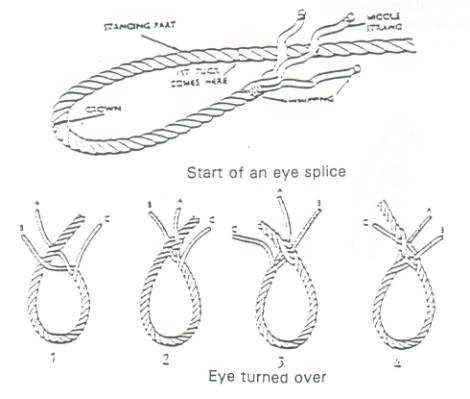
Eye Splice
Whip the rope at a distance from its end equal to 20 times the diameter of the rope, then unlay it to the whipping and whip the end of each strand. Mark the place intended for the crown of the eye, and bend the rope back from there so as to bring the unlaid strands alongside the place where the splice is to be made, with the left and middle strands lying on the tope of the rope; the set of the splice will depend on selecting this middle strand correctly.
Now refer to fig. in which the middle strand is marked A, the left hand strand B, and the right hand strand C, and make the splice as follows:-
1.
Tuck A, from right to left, under the nearest strand of
the standing part.
2. Tuck B/ from right to left, under the next
strand of the standing part.
3. Now turn the rope right over so as to
bring the remaining strand C on the top, and then tuck C
from right to left under the unoccupied strand of the
standing part. Care must be taken to retain the lay of
the rope in the last strand tucked, as this enables it to
lie closer.
4. Now, beginning with C, heave each strand
taut. Then tuck all three strands a second and third
time.
5. Finish off by tapering the splice or, if
the appearance of the splice is of secondary importance
and maximum strength is required, by dogging the ends.
Halve each of the three strands and whip each half to its
neighbour over the adjacent strand of the main rope.
Short Splice
The strands of each rope are tucked between the strands of the other rope against the lay, each strand being taken over the strand on its left, then under the next strand and emerging between this and the subsequent strand. In fig, the ends of the ropes are lettered A and B, and their unlayed strands C, D and E, and F, G and H respectively. (Certain whippings and stops have been omitted to show the tucking of the strands more clearly).
1.
Whip each rope at a distance from its end equal to 20
times the diameter of the rope (this whipping has been
omitted from rope A in the illustration).
2. Unlay the strands to the whipping and whip
their ends (these whippings have also been omitted).
3. Marry the two ropes so that one strand of
each lies between two strands of the other (i).
4. Having ensured a close marry, whip the
strands strongly round the join t
prevent them slipping, and stop ends C, D and E to
rope B with a strong stop
(whipping and stops have been omitted).
5. Cut the whipping on A.
6. Take F over
C/ under E and bring it out
between E and D (ii).
7. Take G over E, under D, and bring it out
between D and C (ii and iii).
8. Take H over D, under C and bring it out
between C and E (iii).
9. Stop G, F and H to A, cut the stop and
whipping on B, and tuck C, D and E in a similar manner.
10. Heave all six strands equally taut.
11. Again tuck each
strand over the strand on its left and under the next
one, and then repeat this operation a third time.
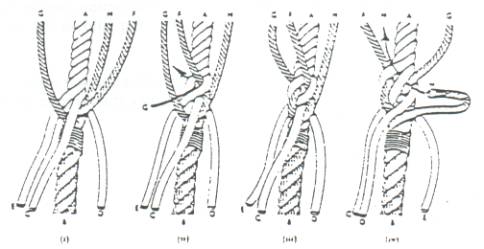
If the splice is not to be served, finish off by dogging the strands as shown.
Splicing man-made fibre cordage
Special care is needed when splicing man-made fibre cordage because it is more slippery. When unlaying strands make sure that the yards are disturbed as little as possible. Firm whippings of twine or tape must be used and the ends of strands fused. When making an eye splice a throat seizing is recommended, otherwise the procedure is as for making an eye splice in natural fibre cordage.
Serving a splice is not recommended because it tends to loosen when the rope's diameter decreases under load.
Polyamide and polyester fibre ropes should have four full hitches with complete strands and two tucks with reduced strands. The protruding ends should be at least three times the ropes diameter in length. The portion of the splice with the reduced strands should be securely wrapped with adhesive tape.
Polypropylene fibre ropes should have at least three but not more than four full ticks in the splice. The protruding ends should be at least three rope diameters in length.
Polyethylene fibre ropes should have four full hitches in the splice with the ends of three rope diameter.
Eye Splice (8-strand plaited rope)
The eye splice in plaited rope is governed by the construction, which has both Z (right-handed) lay strands and S (left-handed) lay strands. Fig. shows the stages of making the splice, as follows:-
1.
Make a throat seizing at a distance from its end
approximately 20 times the diameter of the rope (point of
splice), then unlay the strands taking care not to
disturb the natural lay.
2. Firmly marl each strand.
3. Marry pairs of Z strands and pairs
of S strands making four pairs in all.
4. Commence the tucking sequence by
passing a pair of Z strands under the nearest convenient
pair of Z lay strands in the standing part of the rope,
followed by the adjacent pair of S strands, tucked under
the pair of S lay strands of the rope unoccupied adjacent
to the Z lay.
5. Turn the rope right over and repeat (3)
with the remaining two pairs of Z and S strands. This
completes the first tuck required using paired strands.
6. Divide all four pairs of Z and S
strands and tuck these strands singly, one S strand under
one S strand in the standing part, and one Z strand under
one Z strand in the standing part (iii). Continue this
tucking sequence for four tucks thus giving a total of
five tucks t the splice.
7. The ends of the strands should now be
dogged.
WIRE SPLICING
Whilst splicing wires by hand is rarely done at sea now you are required to be able to recognise a safe splice. For your EDH examination you will be required to produce a splice.
The only wire splice which is required is the eye splice. There are several different types of splices. The one which is described below is acceptable for use anywhere. Some other types may only be used in specialised situations they can be dangerous if used in other situations.
For your first attempt at wire splicing use a small flexible wire, a 6 x 12, 12mm diameter. Also if possible get a seaman to help you as you follow this explanation.
Put a strong whipping on the wire either side of the point where it is to be cut off the sail.
Now put a strong whipping on your piece of wire about 10 x its diameter from the end. Cut of the end whipping and unlay the strands back to the whipping. Now whip the ends of the strands with preformed wires adhesive insulating tape will be sufficient.
The eye should now be formed to the size required. Stop off the two pieces of wire leaving 3 adjacent strands on one side of the standing part and three on the other.
When using the spike to open up the wire be careful not to damage the wire or heart. When the spike has been inserted under the strand to be lifted push it well in to leave sufficient room to pass the strand to be tucked. Be careful not to kink this strand or it will not lie flat.
Bullivant Locking Splice
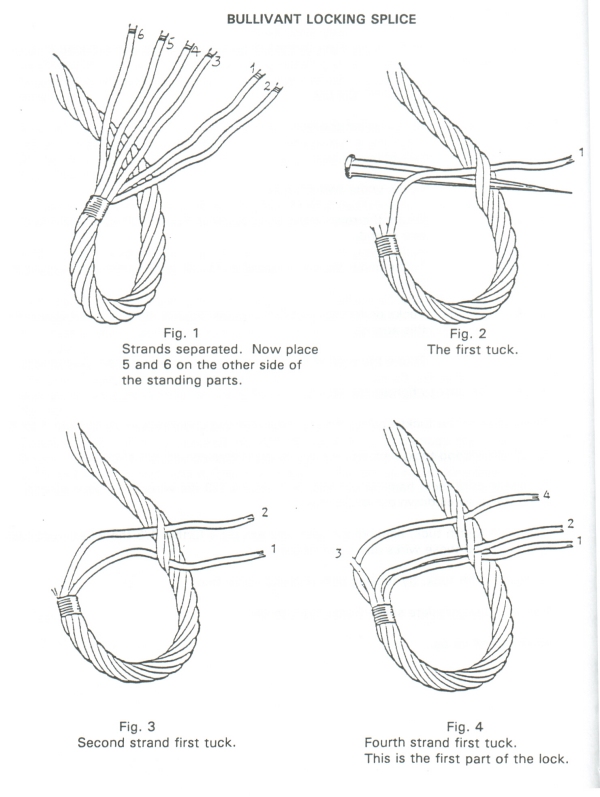
Strands are numbered from the right to the left with eye
formed and working strands at side nearest to you.
The Basics
Nos.
1, 2 and 4 - Tuck with the lay.
Nos. 3, 6 and 5 Tuck against the lay.
Strands tuck in that order.
No. 1 Tucks under two strands.
No. 2 Enters the rope at the same place as No. 1 but
tucks under only one strand.
No. 3 Tucks under the same strand as No. 4, against the
lay, causing a lock.
No. 6 Tucks under the next two strands against the lay,
tuck heart with this strand.
No. 5 Enters the rope at the same place as No.6 but under
one strand. Hammer the tuck to tighten the shape.
The Splice
- Every strand now tucks against the lay, over one and under one working from 1 to 6. Complete second tuck,
- hammer out and then remove cores from strands.
- Complete third tuck,
- hammer out and then extract 1/3 the wires from each strand.
- Bend these wires down out of the way.
- Complete fourth tuck,
- hammer out and then extract a further 1/3 the wires from each strand.
- Bend these wires down out of the way.
- Complete fifth tuck, by tucking over one and under two.
- Hammer out complete splice from crown to tail. Break off all wires.